

So’leah’s Gambit is a second part of the Mythic+ version of Tazavesh, The Veiled Market. This megadungeon has been split into two parts in Mythic+ mode. So’leah’s Gambit includes only 3 last bosses of Tazavesh, but the guide to this part of the dungeon may still be as big as the guide for the Streets of Wonder. How is that possible? You’ll see it right now!
How do you get to Tazavesh?
But first things first, you may need to know how to get to Tazavesh. If you haven’t completed the questline on opening the route to the dungeon before, speak to the innkeeper Host Ta’rela in Oribos. The broker will give you The Al’ley Cat of Oribos quest. It starts a little quest chain that will make you familiar with the lore of the dungeon and the explanation of its mysterious destination in the In-Between.
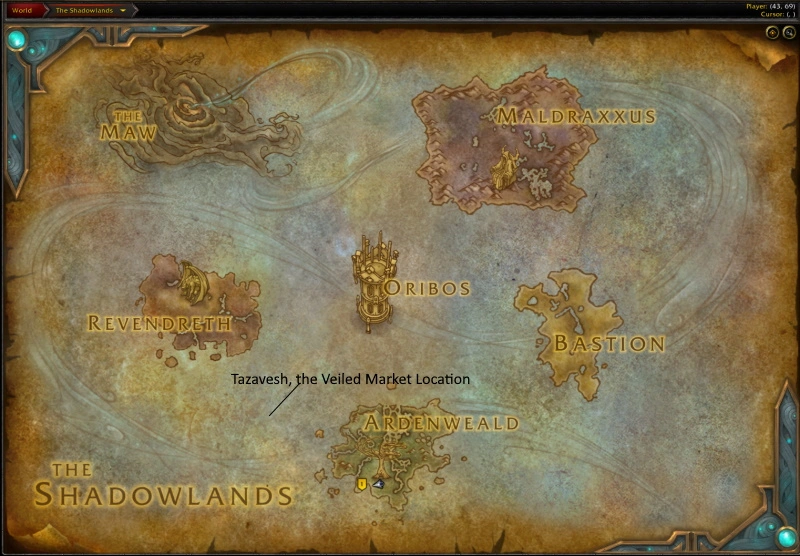
The map shows where Tazavesh is on the map. The main reward for the quest line will be the opening of a flight point next to the dungeon’s entrance. But if your teammates have already completed these quests and have access to it, they are free to just summon you. The actual entrance to the dungeon doesn’t require completing any quests.
So’leah’s Gambit Tips
So’leah’s Gambit takes you quite far away from the Tazavesh. You suddenly appear in the Legion’s location called Stormheim, and there are lots of murlocs around. That’s the crucial trouble of this dungeon in a Mythic+ run, as the packs of murlocs are situated very close to each other and it’s too dangerous to move further without dealing with certain groups. Besides, when their HP is low, they tend to run away to their brethren — a fact that makes you save stuns so that they don’t pull other mobs into the battle. A recommended percentage of enemy forces killed before the fight with a first boss Hylbrande is 38%.
Some certain murlocs cause the most problems. One of the most dangerous enemies is the Murkbrine Scalebinder. The priority for stunning it during the cast of Invigorating Fish Stick may seem even higher than stopping other murlocs from running. If you haven’t succeeded in interrupting that skill, be sure to destroy the totem summoned by it. If, however, you ignore this situation altogether murlocs will start to take way less damage and heal quickly.
Coastwalker Goliath is a mob with one more annoying mechanic that has already been seen in WoW BfA and appears in So’leah’s Gambit in Shadowlands. It casts Tidal Stomp that deals incredible damage followed by an effect that increases the damage of the spell. It would be very unsafe to pull 2 Goliaths if you are unsure that you can fight them at once.
A Cry of Mrrggllrrgg done by Murkbrine Shellcrusher is one more spell that must be interrupted, especially if there are too many murlocs pulled. They are quite aggressive from the very start of a fight, but that Cry makes them especially furious via the enrage, which results in a 100% buff to their damage. While someone can prefer not to meet Stormheim’s murlocs at all, no one would like to deal with them when they’re in an especially bad mood!
The trash before the second So’leah’s Gambit boss is not that dangerous. After fighting Hylbrande you get teleported to Boralus, and the local pirates may seem a little broken after fighting true rulers of the sea. Still, the Burly Deckhand is going to cause some problems because of the Super Saison spell. Deckhand drinks a very strong brew that makes him even drunker than he already is and increases their damage by 100% with the enraged buff. Even though that cast can be interrupted, a problem is that a Deckhand will try to drink again right after the end of the stun’s duration.
After Timecap’n Hooktail boss one more portal will lead you back to the Tazavesh — and back to the Shadowlands after a short walk through the shards of Legion and BfA. Veiled Market will meet you with Focused Ritualists and Devoted Accomplices. The first is the enemies with enormous magic damage, while the latter ones are going to irritate tanks with the Energy Slash spell, which debuffs the target with an increased amount of damage received from the next Slash. Besides, Reinvigorate spell is one more spell with a high priority of interrupting it, as after 3,5 seconds of the cast it heals the caster for a large amount and buffs its haste.
But the most dangerous mob for this part of the dungeon — and, maybe, in the whole So’leah’s Gambit Guide, — is the Adorned Starseer. Mainly because of the Wandering Pulsar spell. It casts a Pulsar that deals lots of damage to all the players around. That makes it a target of the highest priority, especially because the spell that summons it is not that easy to interrupt. Besides, right before the last boss, there will be two packs of mobs with two Adorned Starseers at the same time. And you should keep in mind one more dangerous spell they’re ready to cast on every member of your party — a destructive Drifting Star that damages everyone in its path, — there’s no shame in popping Bloodlust when dealing with them.
So’leah’s Gambit Bosses Guidelines
If even mobs of Tazavesh: So’leah’s Gambit’s needed a sort of guide, its bosses deserve it too.
Hylbrande
The first boss is Hylbrande. One part of a guide for Hylbrande is obvious and old as the game itself: the boss must be faced away from any other players so that they don’t get damaged by Shearing Swings and Titanic Crash. But there is a much bigger threat: on the orders of Hylbrande, a special turret will cast a laser beam targeted at various group members.
Not only that beam deals big damage to the player but also pollutes an area where they stand with a Purging Field. That should make you move carefully so that you have enough space safe from damaging puddles. Besides, you’d better not leave puddles before the consoles in the hall and the edges of the room, as they will be crucial for the next phase of the fight.
The next phase can be calculated from the moment this boss gains 100 energy points and initiates Sanitizing Cycle. An interesting encounter starts: 4 orbs appear in the middle of the hall. One player can bear only one orb and must bring it to the correct location. The player who didn’t get any orb also has an important mission: to run to the main big console in a faraway corner of the room and look at its display. It will show the correct places for each orb according to their colors.
A player near the main console must navigate other members of the party so that they don’t place the wrong sphere in the wrong place. Otherwise, the party will get damaged and stunned for three seconds by the Runic Feedback. That’s especially dangerous because of the Sanitizing Field that continuously fills the hall in which you are fighting.
During the fight, the boss will also call two Vault Purifiers, who will reduce damage taken by Hylbrande and cast Valorous Bolts at the different players. But the main threat caused by them is the Keeper’s Protection spell which would be automatically cast on the aforementioned panels, blocking players from interacting with them. That puts the highest priority on killing the mobs as soon as possible, preferably before Hylbrande casts Sanitizing Cycle.
Timecap’n Hooktail
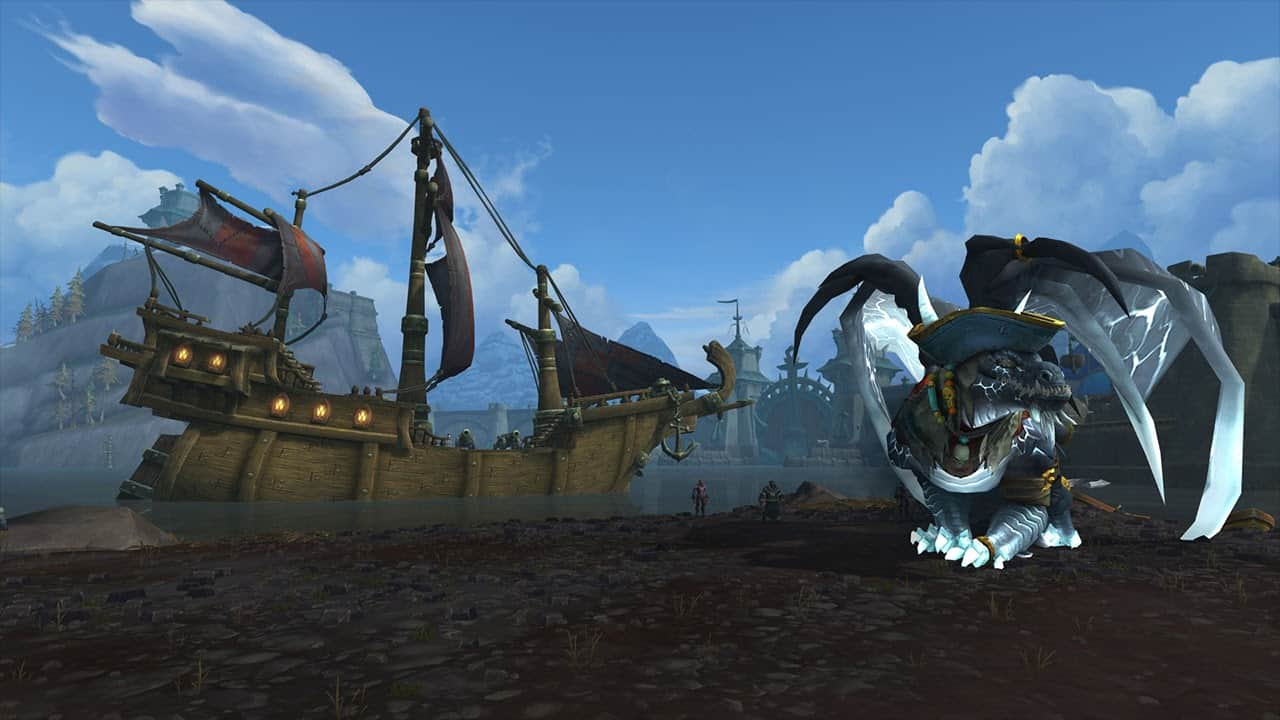
The guide on Timecap’n Hooktail won’t be as unique as the boss itself, although some mechanics must be specified. First of all, the encounter will be reminiscent of other grand dragon boss encounters, as players must get as far away from the tail of the boss as possible. Besides, players mustn’t stand in front of the boss so that they don’t get damaged by Infinite Breath. Tanks can also avoid it, as after 1.5 seconds of cast dragon gets fixed on a certain place where it will eventually breathe.
But there is someone who must be damaged by that spell — the Corsair Brutes who come to aid the unique pirate dragon during the fight. The dragon’s breath will instantly kill them. It’s in your best interest that it does. Because if not, pirates will be buffed by the boss spell Double Time which will greatly increase the damage and haste of all the corsairs.
It’s a pity, but the boss can’t kill the annoying sharks that may start hunting you while you’re being dragged to the water with the Anchor Shot. Those sharks one-shot you after three seconds of you being in the water, so the only way to survive them is to run to the land! Finally, a pirate boss encounter couldn’t have avoided the Cannon Barrages. The boat of a Timecap’n Hooktail will shoot the players from time to time.
So’leah
Famous for the So’leah’s Secret Technique trinket, So’leah won’t easily give it away. Instead, the boss will gladly summon So’Cartel Assassins and the Collapsing stars to kill you. Assassins deal lots of instant and over-time damage with the Shuriken Blitz — you must immediately stun and kill the mobs, or they will teleport away while continuing casting the mortally dangerous spell. Hyperlight Spark that jumps among the players during the first phase will already cause enough damage, and you don’t need one more DoT to disturb you.
Besides, the mechanics of the Collapsing Star spell also include a DoT. But what’s unique about this Tazavesh boss is that this DoT must be willingly taken by you. The Star appears with 4 charges which must be taken away from it, preferably by one player. That player can be a healer, although some parties may give this task to another role. The task is to come in the radius of the star and thus get whole party a debuff called Collapsing Energy, that will damage it for three seconds.
That’s done four times to make Collapsing Star expire. Not waiting for three seconds between doing it stacks the DoT. While reaching 40% HP So’leah will restore it to 100% taking you to the second phase of this boss encounter. Apart from the new appearance, one more interesting spell adds to their arsenal: the Hyperlight Jolt. For the first time, that spell will be cast from the very start of the new phase, when the boss becomes practically invulnerable to any damage.
How to avoid it? Simpler than it seems: boss aims at you with a spell, and that is shown with red arrows on the ground. But if each player stands in such a way that a red arrow passes through one of the five relics the boss has spawned with the beginning of that cast, you won’t get damaged. Instead, So’leah’s link to the relics will be destroyed.
Those relics that haven’t been touched by Jolt will remain until all the links are done with and the boss is vulnerable. Furthermore, an Energy Fragmentation is cast on the survived relics, which makes them shoot deadly energy fragments into players. And a Hyperlight Nova will damage players within 14 yards of the boss or the constructs summoned by them.
As the Collapsing Star mechanic remains in the second phase, Nova’s damage will badly resonate with it. Boss will try to summon relics a few more times, although only one will be summoned per cast. As it comes, you will need to carefully count which debuff to gain in which second of a fight and what buttons to save on the case if you won’t manage to destroy the relics at once.
Actually, a part of the last piece of advice is helpful to get ready for every boss listed in the Tazavesh So’leah’s Gambit. You can easily just throw away a Mythic keystone if you go to the Mythic+ dungeon without a preliminary calculation of the approximate damage that can be received in the worst possible case of this or that encounter. However, Mythic+ is such a game experience that is at the same time a good practice and study of boss mechanics.